Getting Started🔗︎
In the quick start guide, we learned how to create a Kubernetes cluster using a preset configuration. Now, we will explore how to create a customized cluster topology that meets your specific requirements.
This step-by-step guide will walk you through the process of creating a custom cluster configuration file from scratch and using it to create a functional Kubernetes cluster with one master and one worker node. By following the steps outlined in this guide, you will have a Kubernetes cluster up and running in no time.
Step 1 - Ensure all requirements are met🔗︎
Before progressing with this guide, take a minute to ensure that all of the requirements are met. Afterwards, simply create a new YAML file and open it in a text editor of your choice.
Step 2 - Prepare hosts configuration🔗︎
In the cluster configuration file, the first step is to define hosts. Hosts represent target servers that can be either local or remote machines.
When setting up the cluster on your local host, where the command line tool is installed, be sure to specify a host with a connection type set to local.
hosts:
  - name: localhost # (1)!
    connection:
      type: local
- Custom unique name of the host.
In case the cluster is deployed on a remote host, you will be required to provide the IP address of the remote machine along with the SSH credentials.
hosts:
  - name: my-remote-host
    connection:
      type: remote
      user: myuser
      ip: 10.10.40.143 # (1)!
      ssh:
        keyfile: "~/.ssh/id_rsa_server1" # (2)!
-
IP address of the remote host.
-
Path to the password-less SSH key file required for establishing connection with the remote host.
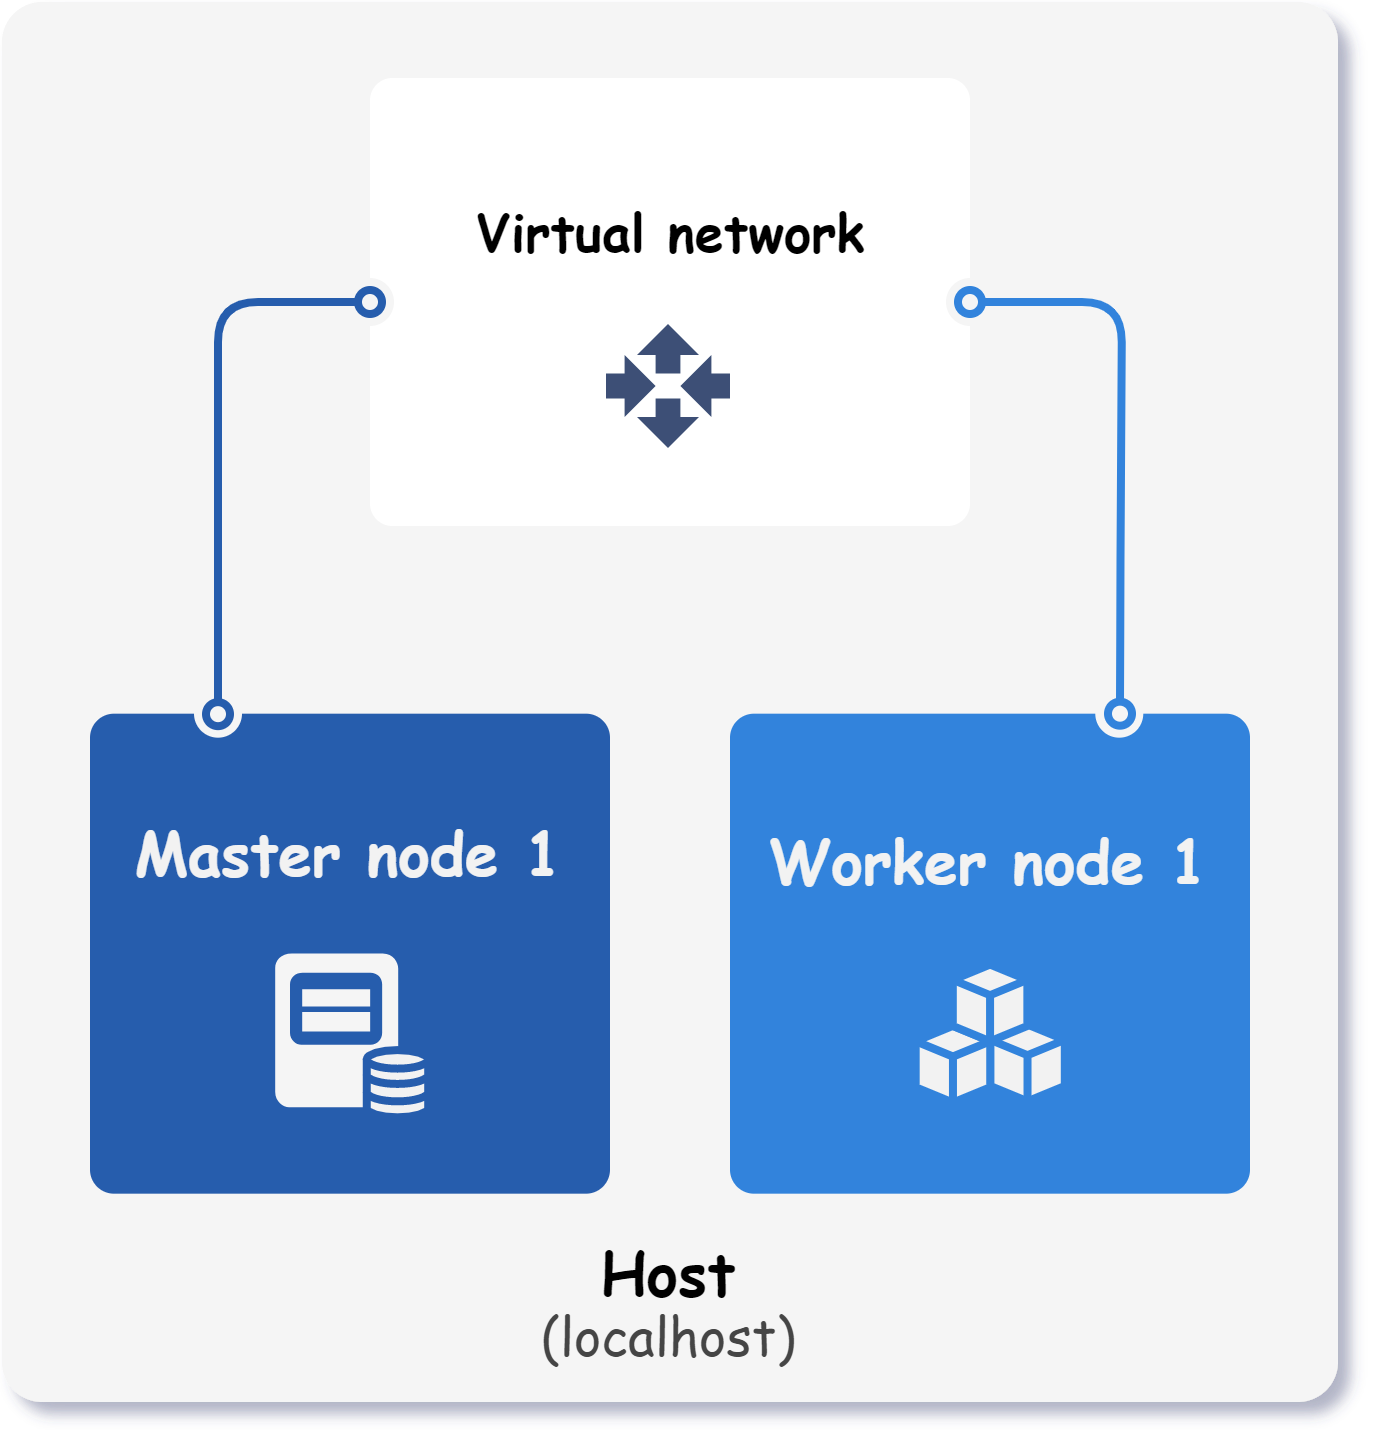
Throughout this guide, only localhost will be used.
Step 3 - Define cluster infrastructure🔗︎
The second part of the configuration file consists of the cluster infrastructure. In this part, all cluster nodes are defined along with their properties such as operating system, CPU cores, amount of RAM and so on.
Below is an image that visualizes the components of the final cluster.
Let's shift our attention to the following configuration:
cluster:
  name: k8s-cluster
  network:
    ...
  nodeTemplate:
    ...
  nodes:
    ...
As we can see, the cluster infrastructure section consists of the cluster name and three subsections:
-
cluster.nameThe cluster name is used as a prefix for each resource created by Kubitect. It's an essential property that helps identify and manage resources created by Kubitect.
-
cluster.networkThe network subsection holds information about the network properties of the cluster. It defines the IP address range, the mode of networking, and other network-specific properties that apply to the entire cluster.
-
cluster.nodeTemplateThe node template subsection contains properties that apply to all nodes in the cluster, such as the operating system, SSH user, and SSH private key.
-
cluster.nodesThe nodes subsection defines each node in our cluster. This subsection includes information such as the node name, node type, and other node-specific properties.
Now that we have a general idea of the cluster infrastructure configuration, let's examine each of these subsections in more detail to understand how to define them properly and configure a Kubernetes cluster using Kubitect.
Step 3.1 - Cluster network🔗︎
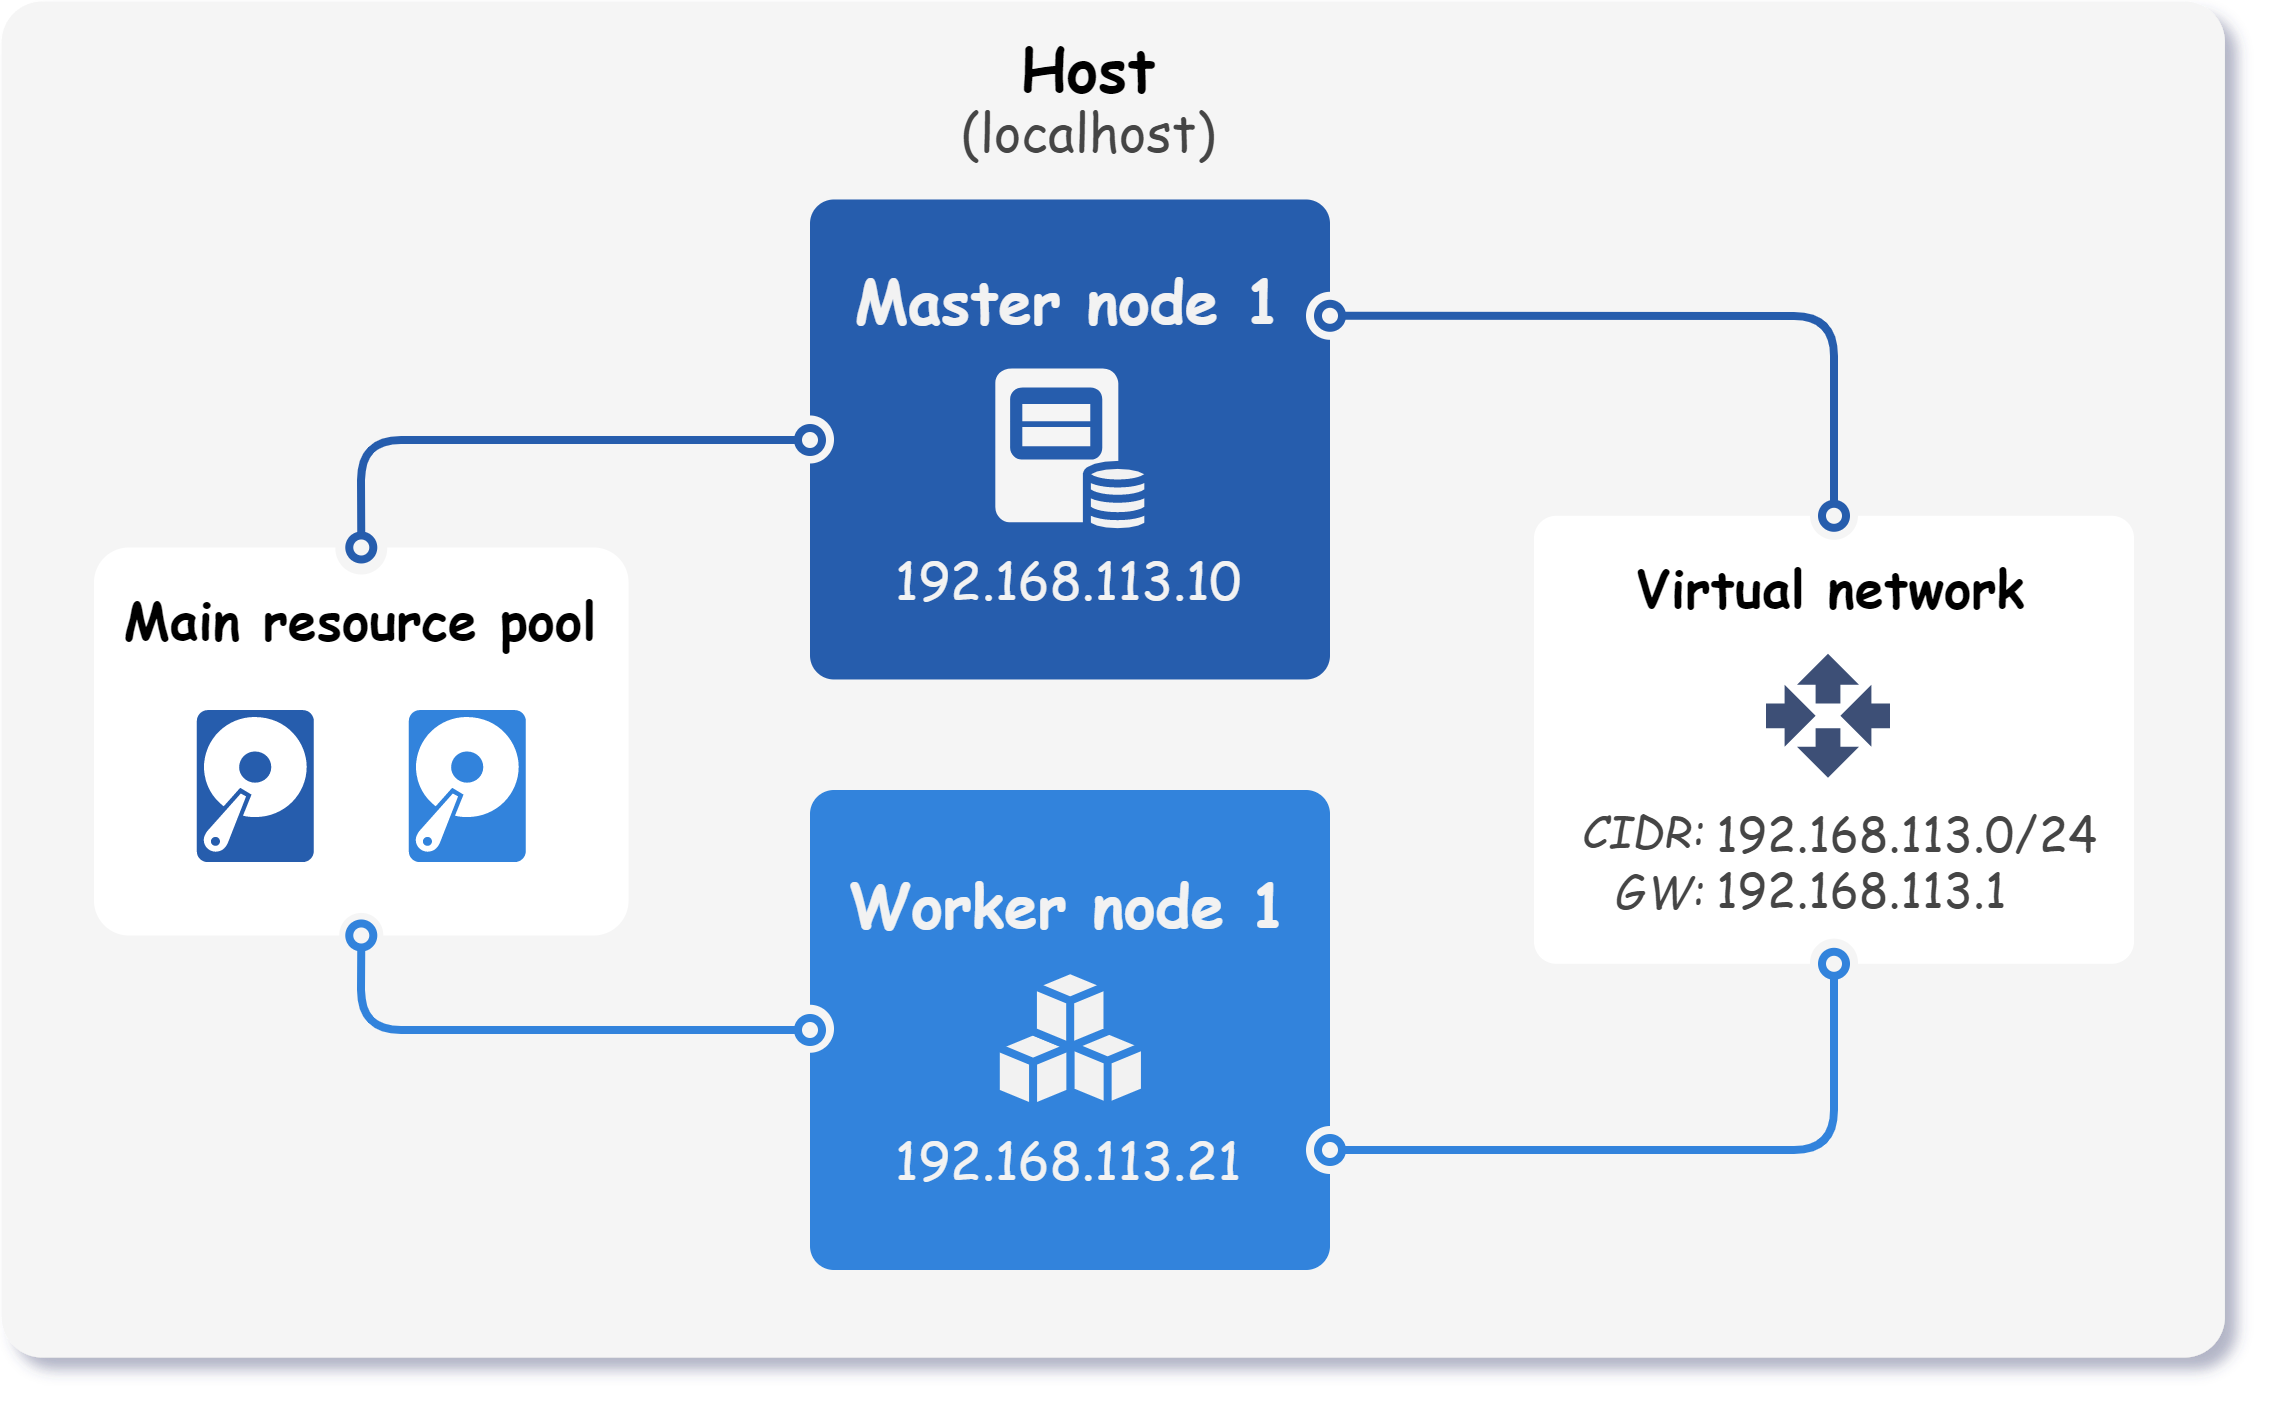
In the network subsection of the Kubernetes configuration file, we need to define the network that our cluster will use. Currently, there are two supported network modes - NAT or bridge.
The nat network mode creates a virtual network that performs network address translation. This mode allows the use of IP address ranges that do not exist within our local area network (LAN).
On the other hand, the bridge network mode uses a predefined bridge interface, allowing virtual machines to connect directly to the LAN. This mode is mandatory when the cluster spreads over multiple hosts.
For the sake of simplicity, this tutorial will use the NAT mode as it does not require a preconfigured bridge interface.
cluster:
  ...
  network:
    mode: nat
    cidr: 192.168.113.0/24
The above configuration will instruct Kubitect to create a virtual network that uses 192.168.113.0/24 IP range.
Step 3.2 - Node template🔗︎
The nodeTemplate subsection allows you to define general properties for all nodes in the cluster. While there are no required fields, there are several useful properties you may want to include.
-
userThis property specifies the name of the user that will be created on all virtual machines and used for SSH. (default:
k8s) -
os.distroThis property defines the operating system for the nodes. By default, the nodes use the latest Ubuntu 22.04 release. To explore other available distributions, please refer to the OS Distribution section in the node template of our user guide.
-
ssh.addToKnownHostsWhen this property is set to true, all nodes will be added to SSH known hosts. If you later destroy the cluster, these nodes will also be removed from the known hosts.
-
updateOnBootThis property determines whether virtual machines are updated at first boot
To illustrate, let's set these nodeTemplate properties in our configuration file:
cluster:
  ...
  nodeTemplate:
    user: k8s
    updateOnBoot: true
    ssh:
      addToKnownHosts: true
    os:
      distro: ubuntu22
Step 3.3 - Cluster nodes🔗︎
In the nodes subsection, we define all nodes that will form the cluster. Each node can be defined as one of the following three types:
-
workerA worker node runs the applications and workloads that are deployed in the cluster. It communicates with the master node to receive instructions on how to schedule and run the containers.
-
masterMaster nodes are responsible for managing and coordinating the worker nodes in the cluster. Therefore, each cluster must contain at least one master node.
Since etcd key-value datastore is also present on these nodes, the number of master nodes must be odd. For more information, see etcd FAQ.
-
loadBalancerThese nodes serve as external load balancers that expose the Kubernetes control plane at a single endpoint. They are required when more then one master node is configured in the cluster.
This guide is focused on deploying a Kubernetes cluster with a single master node. However, if you are interested in creating a multi-master or high-availability (HA) cluster, please refer to the corresponding examples.
To better understand this part, let's take a look at an example configuration:
cluster:
  ...
  nodes:
    master:
      default: # (1)!
        ram: 4 # (2)!
        cpu: 2 # (3)!
        mainDiskSize: 32 # (4)!
      instances: # (5)!
        - id: 1 # (6)!
          ip: 192.168.113.10 # (7)!
    worker:
      default:
        ram: 8
        cpu: 2
        mainDiskSize: 32
      instances:
        - id: 1
          ip: 192.168.113.21
          ram: 4 # (8)!
-
Default properties are applied to all nodes of the same type, which in this case are the master nodes. They are particularly useful to quickly configure multiple nodes of the same type.
-
The amount of RAM allocated to the master nodes (in GiB).
-
The number of virtual CPUs assigned to each master node.
-
The size of the virtual disk attached to each master node (in GiB).
-
A list of master node instances.
-
The instance ID is the only required field that must be specified for each instance.
-
A static IP address set for this particular instance. If the
ipproperty is omitted, the node requests a DHCP lease during creation. -
In this example, the amount of RAM allocated to the worker node instance is set to 4 GiB, which overwrites the default value of 8 GiB.
Step 3.4 - Kubernetes properties🔗︎
The final section of the cluster configuration contains the Kubernetes properties, such as the Kubernetes version and network plugin.
In addition, you can deploy the Kubernetes cluster either using kubespray (default) or k3s.
kubernetes:
  manager: kubespray
  version: v1.28.6
  networkPlugin: calico
  other:
    mergeKubeconfig: true # (1)
- Kubeconfig can be automatically merged into
~/.kube/configwhen a cluster is created by setting property mergeKubeconfig totruein the cluster's configuration file.
Step 4 - Create the cluster🔗︎
Below is the final configuration for our Kubernetes cluster:
Final cluster configuration
hosts:
  - name: localhost
    connection:
      type: local

cluster:
  name: k8s-cluster
  network:
    mode: nat
    cidr: 192.168.113.0/24
  nodeTemplate:
    user: k8s
    updateOnBoot: true
    ssh:
      addToKnownHosts: true
    os:
      distro: ubuntu22
  nodes:
    master:
      default:
        ram: 4
        cpu: 2
        mainDiskSize: 32
      instances:
        - id: 1
          ip: 192.168.113.10
    worker:
      default:
        ram: 8
        cpu: 2
        mainDiskSize: 32
      instances:
        - id: 1
          ip: 192.168.113.21
          ram: 4

kubernetes:
  version: v1.28.6
  networkPlugin: calico
  other:
    mergeKubeconfig: true
To create the cluster, apply the configuration file to Kubitect:
kubitect apply --config kubitect.yaml
Tip
If you encounter any issues during the installation process, please refer to the troubleshooting page first.
After applying the configuration file to Kubitect, a directory for the created Kubernetes cluster is generated and stored in Kubitect's home directory. The default location for the home directory is ~/.kubitect and has the following structure.
~/.kubitect
   ├── clusters
   │   ├── k8s-cluster
   │   ├── my-cluster
   │   └── ...
   └── share
       ├── terraform
       └── venv
The clusters directory contains a subdirectory for each Kubernetes cluster that you have created using Kubitect. Each subdirectory is named after the cluster, for example k8s-cluster. The configuration files for each cluster are stored in these directories.
The share directory contains files and directories that are shared between different cluster installations.
All created clusters can be listed at any time using the list subcommand.
kubitect list clusters

# Clusters:
#   - k8s-cluster (active)
#   - my-cluster (active)
Step 5 - Test the cluster🔗︎
Finally, to confirm that the cluster is ready, you can list its nodes using the kubectl command:
kubectl --context k8s-cluster get nodes
Where do I find kubeconfig?
Once the Kubernetes cluster is deployed, the Kubeconfig file can be found in the cluster's directory.
You can easily export the Kubeconfig into a separate file using the following command, which creates a file named kubeconfig.yaml in your current directory.
kubitect export kubeconfig --cluster k8s-cluster > kubeconfig.yaml
Kubeconfig can be also automatically merged into existing ~/.kube/config when a cluster is created by setting property mergeKubeconfig to true in the cluster's configuration file.
 Congratulations, you have completed the getting started quide.