Rook cluster🔗︎
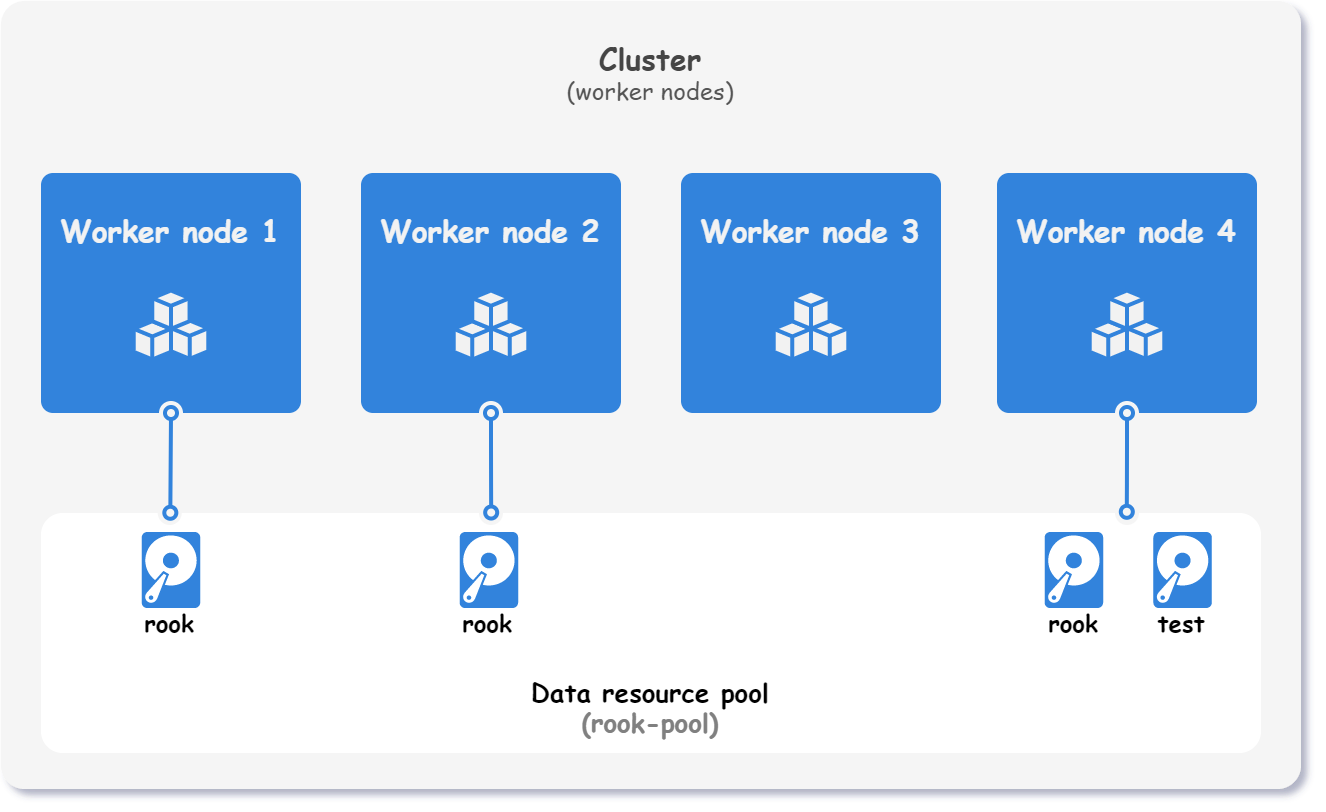
This example shows how to use Kubitect to set up distributed storage with Rook. For distributed storage, we add an additional data disk to each virtual machine as shown on the figure below.
This example demonstrates how to set up distributed storage with Rook. To achieve distributed storage, we add an additional data disk to each virtual machine, as depicted in the figure below. This additional data disk is utilized by Rook to provide reliable and scalable distributed storage solutions for the Kubernetes cluster.
Basic setup🔗︎
Step 1: Define data resource pool🔗︎
To configure distributed storage with Rook, the data disks must be attached to the virtual machines. By default, each data disk is created in the main resource pool. However, it is also possible to configure additional resource pools and associate data disks with them later, depending on your requirements.
In this example, we define an additional resource pool named rook-pool.
hosts:
  - name: localhost
    connection:
      type: local
    dataResourcePools:
      - name: rook-pool
Step 2: Attach data disks🔗︎
After the data resource pool is configured, we are ready to allocate some data disks to the virtual machines.
cluster:
  nodes:
    worker:
      instances:
        - id: 1
          dataDisks:
            - name: rook
              pool: rook-pool # (1)!
              size: 256
        - id: 2
          dataDisks:
            - name: rook
              pool: rook-pool
              size: 256
        - id: 3
        - id: 4
          dataDisks:
            - name: rook
              pool: rook-pool
              size: 256
            - name: test
              pool: rook-pool
              size: 32
- To create data disks in the main resource pool, either omit the pool property or set its value to
main.
Step 3: Enable Rook addon🔗︎
After configuring the disks and attaching them to the virtual machines, activating the Rook add-on is all that is required to utilize the distributed storage solution.
addons:
  rook:
    enabled: true
By default, Rook resources are provisioned on all worker nodes in the Kubernetes cluster, without any constraints. However, this behavior can be restricted using node selectors, which are explained later in the guide.
Final cluster configuration
hosts:
  - name: localhost
    connection:
      type: local
    dataResourcePools:
      - name: rook-pool

cluster:
  name: rook-cluster
  network:
    mode: nat
    cidr: 192.168.113.0/24
  nodeTemplate:
    user: k8s
    updateOnBoot: true
    ssh:
      addToKnownHosts: true
    os:
      distro: ubuntu22
  nodes:
    master:
      instances:
        - id: 1
    worker:
      instances:
        - id: 1
          dataDisks:
            - name: rook
              pool: rook-pool
              size: 256
        - id: 2
          dataDisks:
            - name: rook
              pool: rook-pool
              size: 256
        - id: 3
        - id: 4
          dataDisks:
            - name: rook
              pool: rook-pool
              size: 256
            - name: test
              pool: rook-pool
              size: 32

kubernetes:
  version: v1.28.6

addons:
  rook:
    enabled: true
Step 4: Apply the configuration🔗︎
kubitect apply --config rook-sample.yaml
Node selector🔗︎
The node selector is a dictionary of labels and their potential values. The node selector restricts on which nodes Rook can be deployed, by selecting only those nodes that match all the specified labels.
Step 1: Set node labels🔗︎
To use the node selector effectively, you should give your nodes custom labels.
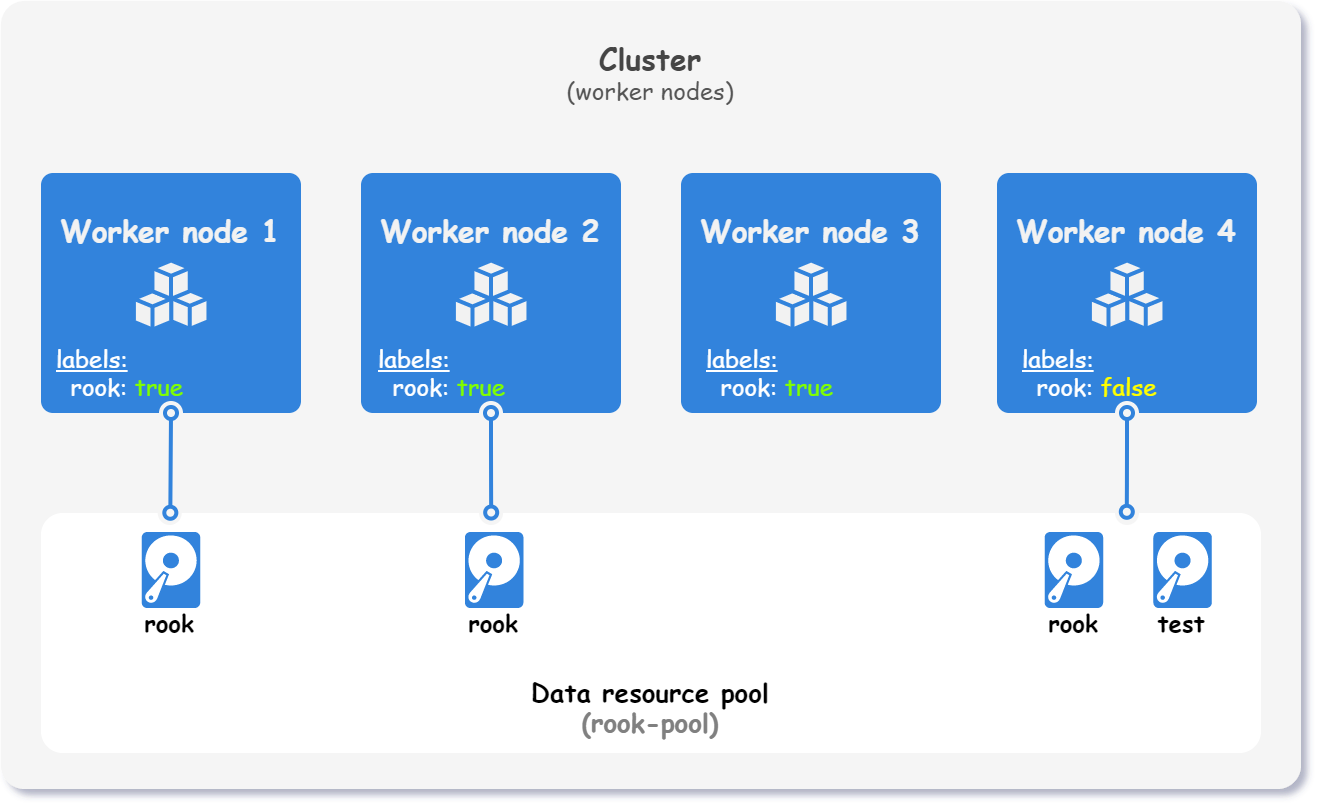
In this example, we label all worker nodes with the label rook. To ensure that scaling the cluster does not subsequently affect Rook, we set label's value to false by default. Only the nodes where Rook should be deployed are labeled rook: true, as shown in the figure below.
The following configuration snippet shows how to set a default label and override it for a particular instance.
cluster:
  nodes:
    worker:
      default:
        labels:
          rook: false
      instances:
        - id: 1
          labels:
            rook: true # (1)!
        - id: 2
          labels:
            rook: true
        - id: 3
          labels:
            rook: true
        - id: 4
- By default, the label
rook: falseis set for all worker nodes. Setting the labelrook: truefor this particular instance overrides the default label.
Step 2: Configure a node selector🔗︎
So far we have labeled all worker nodes, but labeling is not enough to prevent Rook from being deployed on all worker nodes. To restrict on which nodes Rook resources can be deployed, we need to configure a node selector.
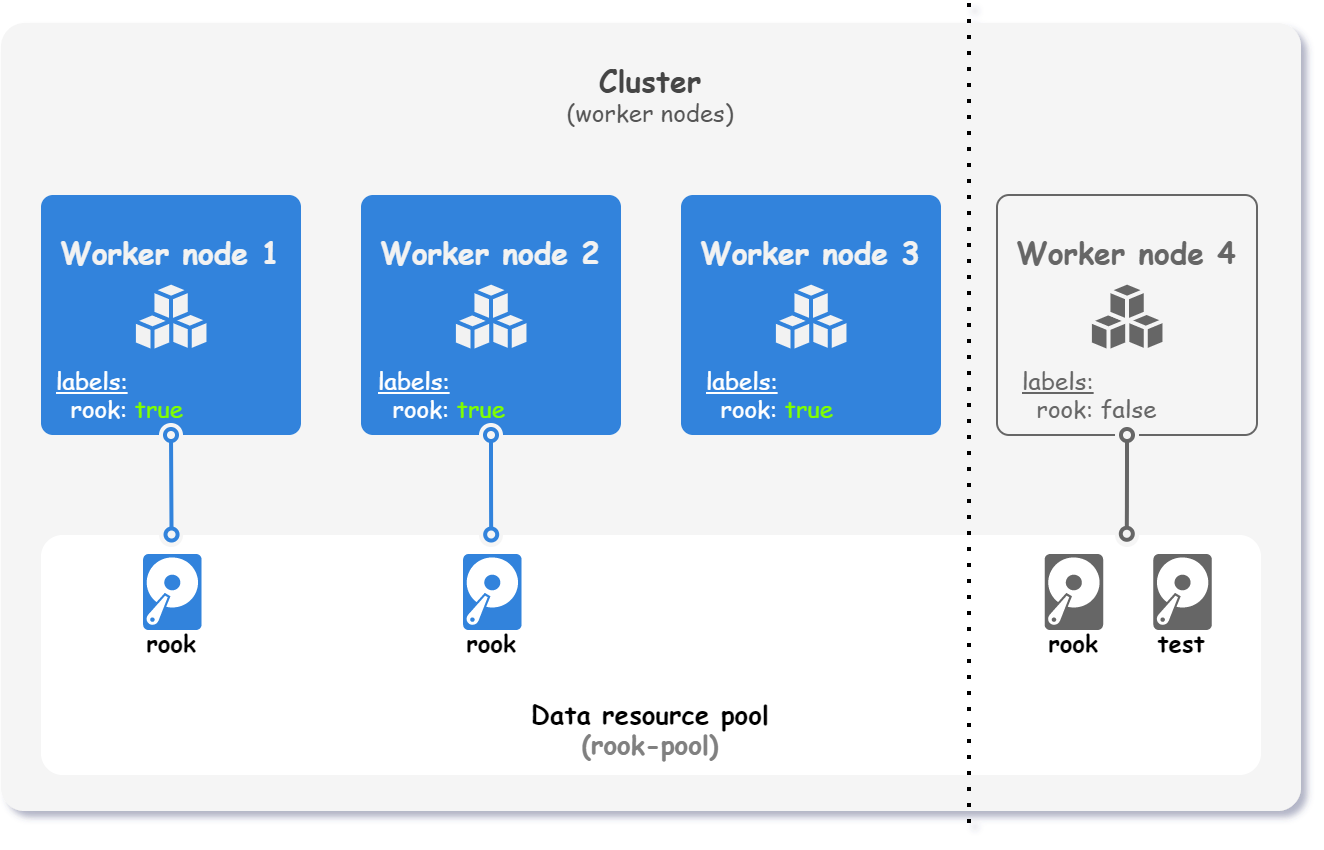
We want to deploy Rook on the nodes labeled with the label rook: true, as shown in the figure below.
The following configuration snippet shows how to configure the node selector mentioned above.
addons:
  rook:
    enabled: true
    nodeSelector:
      rook: true
Final cluster configuration
hosts:
  - name: localhost
    connection:
      type: local
    dataResourcePools:
      - name: rook-pool

cluster:
  name: rook-cluster
  network:
    mode: nat
    cidr: 192.168.113.0/24
  nodeTemplate:
    user: k8s
    updateOnBoot: true
    ssh:
      addToKnownHosts: true
    os:
      distro: ubuntu22
  nodes:
    master:
      instances:
        - id: 1
    worker:
      default:
        labels:
          rook: false
      instances:
        - id: 1
          labels:
            rook: true
          dataDisks:
            - name: rook
              pool: rook-pool
              size: 256
        - id: 2
          labels:
            rook: true
          dataDisks:
            - name: rook
              pool: rook-pool
              size: 256
        - id: 3
          labels:
            rook: true
        - id: 4
          dataDisks:
            - name: rook
              pool: rook-pool
              size: 256
            - name: test
              pool: rook-pool
              size: 32

kubernetes:
  version: v1.28.6

addons:
  rook:
    enabled: true
    nodeSelector:
      rook: true
Step 3: Apply the configuration🔗︎
To deploy a cluster, apply the configuration file:
kubitect apply --config rook-sample.yaml